Skill Checks
Every meaningful decision in Zero Parades passes through dice. This is the math, the trade-offs, and the design philosophy underneath it.
How skill checks work
Skill checks in Zero Parades are 2d6 plus modifiers against a target number. The game shows you everything before you commit: the target, your modifiers, your current odds, and a plain-English descriptor for your chances ("almost trivial," "safe-ish bet," "expect despair"). (Source: Remap Radio, Eurogamer reviews.)
Modifiers come from your skill level, equipped clothing, active Thoughts (Conditioning), the situation, and Hershel's current state. A bullet in the shoulder will tank your rolls long after the fight is over. Skill points and the right outfit can lower a check that looked impossible into something workable.
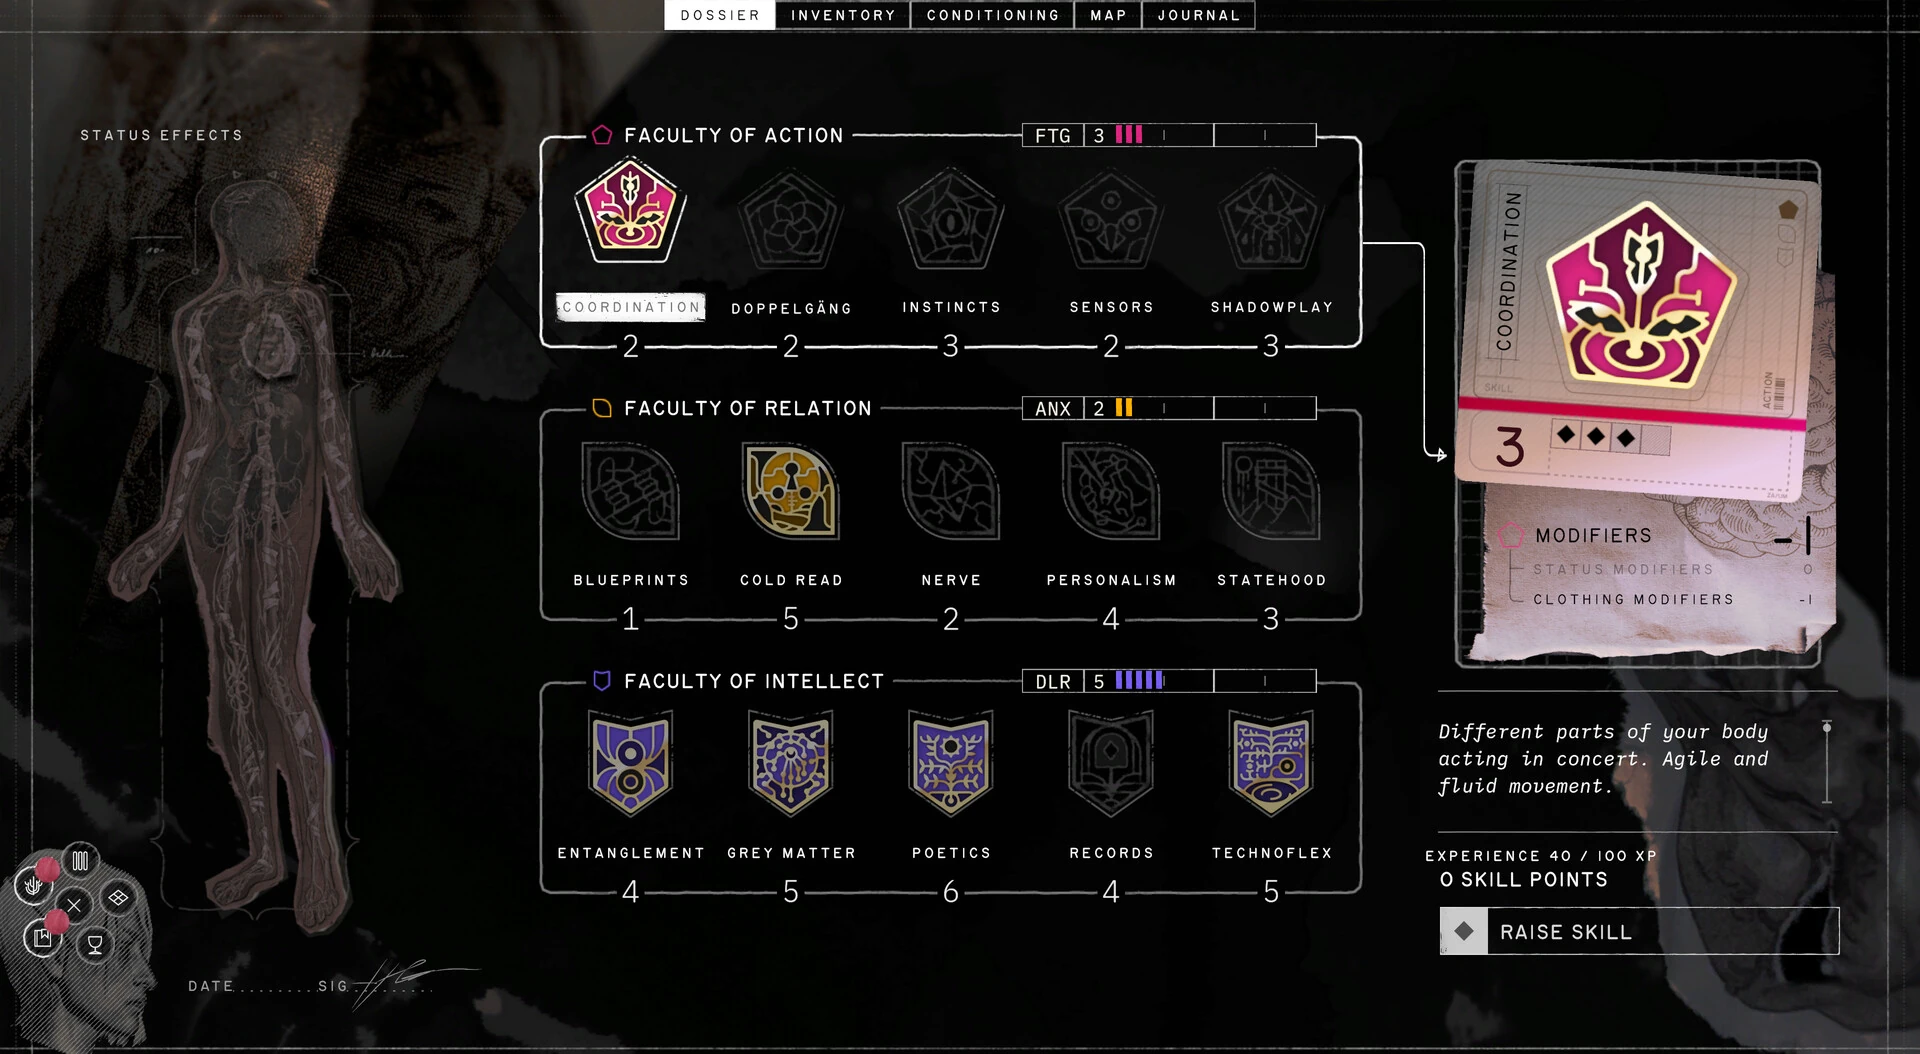
The three faculties
The 15 skills divide into three faculties. Each faculty is color-coded and bound to one of the three Pressure bars. Exerting a faculty stresses its bar.
- Faculty of Action (red) — physical skills. Coordination, Doppelgäng, Instincts, Sensors, Shadowplay. Exerting them raises Fatigue.
- Faculty of Relation (yellow) — social skills. Blueprints, Cold Read, Nerve, Personalism, Statehood. Exerting them raises Anxiety.
- Faculty of Intellect (purple) — mental skills. Entanglement, Grey Matter, Poetics, Records, Technoflex. Exerting them raises Delirium.
Pressures and exertion
Hershel carries three internal bars: Fatigue, Anxiety, and Delirium. Each has a soft ceiling and a hard one. When you hit a check and your odds look bad, you can exert the skill — add a third die to the pool and take the best two of three. The cost is a spike in the matching Pressure bar.
Cap any Pressure at its hard ceiling and the game forces you to remove a skill point as punishment for the overreach. This is the meaningful trade. Push too hard, lose ground permanently. (Source: Vice, Eurogamer reviews.)
Each Pressure has a consumable category that lowers it at the cost of another:
- Coffee lowers Fatigue, raises Anxiety.
- Alcohol lowers Anxiety, raises Delirium.
- Cigarettes lower Delirium, raise Fatigue.
Sleeping resets all three to manageable levels, but burns in-game time.
White checks vs red checks
Active dice rolls come in two flavors:
- White checks — retryable. Fail one and you can come back after you level the required skill, change your outfit, swap in a new Thought, or hit some other narrative trigger.
- Red checks — one shot. "Stop. Danger. No rerolls, Operant." Roll the dice once and live with the result. These tend to gate the consequential branches. (Source: Eurogamer, Remap Radio.)
There is also a separate class of passive checks the game makes behind the curtain without surfacing them — the narration drops in a detail because Sensors or Records quietly succeeded. You do not roll these, you just notice when they pay out.
Failure as design
Zero Parades is built around the assumption that you will fail. Remap Radio's review puts it plainly: "failure isn't a bad thing. It might not be what you wanted, but the writers of Zero Parades have ensured that failing forward is every bit as rich, well-developed, and reactive as being a high roller." Vice's review backs it up — failed rolls often lead to "branching story progression and unexpected events" rather than blocked paths.
Practical consequence: do not save-scum. The Thought Single-Write Only exists partly to discourage it — it grants +1 on all red checks but triggers a violation if you load from the pause menu. The design wants you to live with what the dice gave you.
Practical tips
- Triage your exertions. Adding the third die feels free until you watch your Anxiety bar cross the hard cap mid-conversation. Save it for rolls that gate something irreversible.
- Stock all three consumable types. You will spike whichever Pressure you neglected. A cigarette is useless when what you need is a beer.
- Read the odds descriptor, not just the percentage. "Almost trivial" still hits snake eyes occasionally. Eurogamer reports rolling through a near-certain check straight into a maxed Anxiety bar.
- Equip for the conversation. The right outfit can flip a red check from 40% to 70%. Browse clothing in the Items catalog and keep two or three loadouts.
- Use the dolphin. The Renotel payphone in the Quisach Roundabout — squish it for a two-hour Blueprints and Technoflex buff plus an Anxiety reduction. Free and re-usable. (Source: Eurogamer.)
- Level skills before retrying white checks. A failed white check at level 2 is a coin flip at level 3 and a near-certainty at level 4. Bank XP, then come back.